
Lifestyle
Nahttypen Essential Stitch Types for Perfect Sewing

Sewing is an art, and like any artist, a seamstress needs the right tools to create stunning works. One of the most vital aspects of sewing lies in understanding Nahttypen—those essential stitch types that bring fabric to life. Whether you’re a seasoned pro or just starting out on your sewing journey, knowing which nahttypen to use can make all the difference in achieving that perfect finish.
Imagine having the ability to choose from a vast array of stitches tailored for every project. From basic seams that hold your garments together securely to intricate decorative stitches that add flair and personality, each type serves its purpose. The world of Nahttypen opens up endless possibilities for creativity and craftsmanship.
So why do these stitch types matter so much? They not only influence how your finished piece looks but also determine its durability and functionality. In this article, we will dive into everything you need to know about Nahttypen—from their definition and importance to practical tips for choosing the right one according to your fabric choice.
Join us as we unravel the threads of sewing mastery!
Understanding Nahttypen
Nahttypen, or stitch types, are the backbone of sewing. They dictate how fabric pieces come together and define the overall look and feel of your projects. With countless options available, understanding these stitches can elevate your work from basic to beautiful.
Each nahttyp serves a specific purpose. Some provide strength for seams that will endure wear and tear, while others add decorative touches that enhance visual appeal. Whether you’re patching up a pair of jeans or creating an elaborate gown, knowing which stitch to use is essential.
The most common nahttypen include straight stitches, zigzag stitches, and overlock stitches. The straight stitch is often the go-to for general sewing tasks due to its simplicity and durability. Zigzag stitches offer flexibility; they stretch with the fabric without breaking—ideal for knits.
Overlock stitching trims excess fabric while simultaneously securing raw edges. This prevents fraying and gives garments a polished finish—a must for professional-looking results! Don’t overlook specialty nahttypen like satin stitches or blind hems; these can create exquisite detailing on various projects.
Understanding Nahttypen also means recognizing their compatibility with different fabrics. Lightweight materials may require finer needles and more delicate threads compared to heavy upholstery fabrics that demand robust stitching techniques.
As you explore different Nahttypen, consider experimenting with them in sample swatches before committing them to your main project. This practice helps build confidence in choosing the right stitch type based on fabric characteristics and desired outcomes.
In essence, mastering Nahttypen enables sewists to enhance their skills dramatically while ensuring each creation meets both functional needs and aesthetic desires.
You Might Also Like: Zuschneidfelle
What Are Nahttypen and Why They Matter
Nahttypen, or stitch types, are the backbone of sewing. They define how two pieces of fabric come together and can make or break a project. Understanding these various stitches opens up a world of possibilities for any sewist.
Each nahttyp serves a specific purpose. Some provide strength, while others offer flexibility or decorative flair. For instance, straight stitches are essential for basic seams, but zigzag stitches allow for stretch in knit fabrics. Choosing the right type is crucial for achieving your desired result.
The impact of nahttypen extends beyond functionality. A well-chosen stitch can enhance the overall look of your garment. Decorative stitching adds personality to simple designs and elevates them into something unique and expressive.
Moreover, certain nahttypen can improve durability. When working with heavy materials like denim or canvas, using reinforced stitches prevents future fraying and ensures that garments withstand wear over time.
In addition to aesthetics and longevity, understanding nahttypen affects comfort too. Seams placed poorly might rub against the skin or restrict movement—an issue easily avoided with proper stitch selection.
Sewers must also consider compatibility between fabric and stitch type when crafting their projects. Using an inappropriate stitch on delicate silk could lead to damage while ignoring necessary strength on heavier fabrics may ruin a piece entirely.
Knowing about different nahttypen allows you to unleash your creativity more effectively—transforming mundane techniques into artful expressions through thoughtful choices in each project you tackle.
Decorative and Specialty Nahttypen
Decorative nahttypen can transform your sewing projects from ordinary to extraordinary. These stitches add flair and personality, making them perfect for embellishing garments or home décor items.
One popular decorative stitch is the zigzag stitch. It’s versatile and often used for finishing edges to prevent fraying. But when you play with its width and length, it becomes a decorative element that adds texture.
Another favorite is the satin stitch, known for its smooth finish that mimics embroidery. It’s ideal for appliqué work or outlining designs on fabric. The result is striking, drawing attention without overwhelming the piece.
For those looking to create intricate patterns, consider using specialty nahttypen like heirloom stitching or pintucks. Heirloom techniques often involve delicate details that evoke a vintage feel while pintucks add sophisticated lines to fabrics.
You might also explore quilting stitches if you’re working on layered fabrics. They not only hold layers together but also provide visual interest through unique patterns created by various needle movements.
Don’t overlook embellishment stitches either! Techniques such as cording or adding beads can elevate a simple project into an eye-catching masterpiece full of character.
Experimenting with these diverse types of nahttypen opens up endless possibilities in your sewing journey. With every stitch choice, you have the chance to let creativity shine and showcase individual style.
Choosing the Right Nahttypen for Your Fabric
Choosing the right Nahttypen for your fabric can make all the difference in your sewing projects. The type of stitch you select affects both durability and appearance. Each fabric has its own characteristics, so understanding these nuances is essential.
When working with lightweight fabrics like chiffon or silk, opt for a straight stitch or a narrow zigzag. These stitches offer minimal bulk while allowing flexibility. A wider stitch on delicate materials could cause puckering, which is not desirable.
For medium-weight fabrics such as cotton and linen, a standard straight stitch works well. It provides strength without compromising the fabric’s integrity. If you’re looking to add some design flair, consider using decorative stitches alongside basic ones.
Heavyweight materials like denim or canvas require sturdier Nahttypen like triple-stitched seams or reinforced backstitching. These stitches ensure that the seams hold up under stress and wear over time. You want them to withstand the test of everyday use.
Don’t forget about knit fabrics! They benefit from stretch stitches, such as serger overlock or zigzag stitching, which allows for movement without breaking threads during wear. This choice keeps garments comfortable while maintaining their shape.
Always test your chosen Nahttypen on scrap pieces before committing to your project. This practice helps identify how different threads interact with various fabrics and ensures you achieve the desired effect without any surprises later on.
Be mindful of thread weight when selecting Nahttypen. Heavier threads are better suited for thicker textiles while lighter options should accompany fine materials to prevent damage during sewing.
Common Mistakes to Avoid
Sewing can be a rewarding craft, but it’s easy to stumble into common pitfalls. Recognizing these mistakes is the first step toward mastering Nahttypen.
One frequent mistake is not matching the stitch type to the fabric. Each material has its own characteristics, and using an incompatible stitch can lead to puckering or tearing. Always check your fabric weight and stretch before selecting your stitch.
Another error occurs when people overlook tension settings on their sewing machines. Incorrect tension can cause thread breakage or uneven seams. Before starting any project, test the tension with scrap fabric for optimal results.
Many crafters forget about pre-washing fabrics as well. Skipping this step might seem minor, but it affects how stitches hold up after washing and wearing. Pre-shrinking ensures that your final product maintains its shape and fit over time.
A common oversight lies in cutting corners during pinning or basting stages. Neglecting these steps often leads to misaligned pieces or uneven hems later down the line. Taking time upfront saves frustration in finishing touches.
Some sewers underestimate the importance of needle selection too. Using an incorrect needle size or type can result in damaged fabrics and poor quality stitches—the right needle makes all the difference for smooth sewing experiences.
Don’t rush through projects without taking breaks! Fatigue impacts concentration levels which may lead you astray from precise stitching techniques needed for successful outcomes with various Nahttypen choices.
By avoiding these common mistakes, you’ll enhance both skill level and enjoyment in every sewing endeavor ahead!
Maintenance and Longevity Tips
Taking care of your sewing projects is essential for ensuring the longevity of your stitches. Nahttypen may vary, but their maintenance requirements often have similarities. Understanding how to care for different stitch types will keep your creations looking fresh and intact.
First, always check the thread tension on your machine. Incorrect tension can lead to fraying or puckering in seams. Regularly adjusting this setting according to fabric type will yield better results and improve durability.
Next, focus on needle selection. Using the right needle size and type for each project prevents damage to both fabric and stitches. A dull or incorrect needle can cause skipped stitches or even breakage, leading to a compromised seam quality.
Cleaning your sewing machine regularly cannot be overlooked either. Dust and lint accumulate over time, affecting performance as well as stitch integrity. Make it a habit to clean out these areas after every few projects for optimal function.
Additionally, consider the washing methods you employ with stitched items. Hand washing is gentler than machine washing; however, if you must use a washer, opt for cold water settings whenever possible. This helps preserve both fabrics and nahttypen from wear caused by heat.
When storing finished pieces or supplies, avoid hanging them where they could stretch out seams unnecessarily. Instead, fold them neatly in drawers away from direct sunlight that might fade colors over time.
Also pay attention when ironing; high heat can adversely affect certain fabrics and disrupt stitch patterns created with delicate threads like silk or polyester blends.
Don’t underestimate repair work! Address any loose threads promptly rather than waiting until they worsen—this proactive approach keeps everything neat while extending life across all nahttypen used in your sewing endeavors.
You Might Also Like: Sodziu
Real-World Applications of Nahttypen
When it comes to sewing, understanding nahttypen can transform your projects from average to exceptional. These stitch types aren’t just technical details; they are the backbone of quality craftsmanship. Whether you’re crafting garments, home décor items, or intricate quilts, the right nahttypen enhances durability and aesthetics.
In clothing construction, for instance, choosing a strong seam like a flat-felled stitch ensures that seams withstand daily wear and tear while maintaining a polished look. For quilting enthusiasts, using decorative stitches not only secures layers but also adds an artistic flair to creations.
Home sewers often explore various nahttypen when creating curtains or pillow covers. A zigzag stitch can effectively finish raw edges while allowing for stretch in fabric—a perfect choice for lightweight materials. On the other hand, buttonhole stitches provide functional yet beautiful openings on shirts and jackets.
Beyond apparel and home textiles, nahttypen find applications in crafts such as bag making or upholstery work. Each project demands consideration of fabric type and usage requirements—every detail matters in achieving professional results.
As you venture into different sewing projects, remember that exploring various nahttypen expands your skill set immensely. Embracing these techniques empowers you to tackle diverse materials with confidence and creativity.
Harnessing the power of appropriate stitching will undoubtedly elevate your craft game. With this knowledge at your fingertips, every piece you create is bound to reflect not just style but also strength and longevity—true hallmarks of exceptional sewing artistry.

Jernsenger (JS) is a conceptual framework that combines structural strength with purposeful expression. Inspired by durable iron structures often seen in Scandinavian design, it represents stability, clarity, and long-term reliability. The concept is applied in strategic planning, communication frameworks, and modern interior design—particularly metal furniture like iron bed frames. By balancing durability with adaptability, Jernsenger provides a stable foundation while allowing flexible interpretation and creative expression.
Jernsenger (JS) is a conceptual framework and physical terminology representing the intersection of structural strength and purposeful expression. It works by providing a stable foundation—often compared to the durability of iron—while allowing for the fluid communication of ideas or the physical comfort of a resting place. This dual nature ensures that messaging or structures remain consistent over time without losing their functional or aesthetic appeal.
There are 3 main benefits of Jernsenger:
-
Long-Term Reliability: It provides a sense of durability for systems and physical objects.
-
Stability and Clarity: It reduces ambiguity by offering a solid framework for communication.
-
Balanced Adaptability: It allows for creative interpretation while maintaining core stability.
The main uses of Jernsenger include strategic planning, modern interior design, and conceptual discussions regarding resilience. It is frequently applied in the creation of an ergonomic sleep sanctuary or the development of durable powder-coated furniture.
Jernsenger consists of 5 main parts:
-
Foundational Essence: The core strength of the concept.
-
Structural Integrity: The physical or logical framework.
-
Clear and Controlled Messaging: The communicative layer.
-
Intentional Design: The aesthetic and functional application.
-
Sustainable Metal Framework: The physical material component in furniture contexts.
Understanding the Concept of Jernsenger
Jernsenger represents a structured form of expression rooted in strength and consistency. It is an idea that emphasizes reliability while conveying a specific purpose or message. Rather than being abstract, Jernsenger reflects a controlled expression within a solid framework. This powerful balance between firmness and communication sets it apart from more generic furniture or linguistic concepts.
Historically, the term has roots in Scandinavian design and ancient trade. According to archaeological findings, settlements used similar structural logic in architecture and traditional crafts to meet modern needs for durability. Today, sites like visitqueendom.com and tropicallyrooted.com discuss its evolution from a static idea to a flexible framework used in modern discussions.
Why Jernsenger Is Gaining Attention
Jernsenger is gaining attention because it aligns with modern needs for stability and clarity. In a fast-changing environment, individuals and businesses seek concepts that emphasize consistency. There are 3 primary reasons for this rising interest:
-
Association with strength: It implies a sense of durability that is highly valued.
-
Adaptability: It fits across different interpretations, from interior design to strategic thinking.
-
Meaningful structure: It supports expression rather than restricting it.
Key Characteristics of Jernsenger
The primary characteristic of Jernsenger is its foundational essence of structural integrity. Whether used in a conceptual model or a physical iron bed, it conveys the idea of something built to last.
There are 4 additional characteristics:
-
Purposeful Expression: Messaging is intentional, clear, and grounded.
-
Consistency Over Time: It reflects continuity rather than temporary impact.
-
Durable Planning: It supports long-term reliability in strategic frameworks.
-
Minimalist Aesthetic: It often features a hvit jernseng (white iron bed) or svart metall (black metal) finish for a professional look.
Applications of It in Modern Contexts
Jernsenger is applied in 3 main modern contexts: conceptual frameworks, creative interpretation, and strategic planning. In conceptual models, it represents systems designed to remain stable while conveying a clear message. Creatively, it symbolizes expressive strength—where ideas are delivered with impact without losing their structure. Strategically, it prioritizes durable planning and consistent communication. In the home, it translates to an ergonomic sleep sanctuary using a sustainable metal framework and integrated lumbar support.
Advantages of Embracing Jernsenger
The main advantage of Jernsenger is the high level of structural strength it provides to any project. There are 5 key benefits:
-
Enhanced weight distribution: Physical Jernsenger frames offer superior edge support.
-
Hypoallergenic metal surface: Ideal for chemical-free living environments.
-
Silent motion technology: Modern versions prevent the squeaking associated with old metal beds.
-
Space-saving solution: The breathable open structure reduces visual clutter in small rooms.
-
Modular design system: Components can often be customized or easily assembled.
Challenges and Limitations of Jernsenger
The risk of over-structure is the primary challenge associated with Jernsenger. When a framework becomes too dominant, flexibility may suffer. This is known as the Risk of Over-Structure, where the system becomes rigid.
There are 2 secondary limitations:
-
Interpretation Variability: Because it is an evolving term, its meaning can be unclear without context.
-
Weight: Physical iron frames are heavier than wood, requiring more effort during the easy assembly process.
How to Apply It Effectively
To apply Jernsenger effectively, you must define the core purpose of the structure or message first. Strength without a clear objective diminishes its value.
Follow these 3 steps for effective application:
-
Maintain Structural Balance: Ensure the structure supports the expression.
-
Use Quality Materials: Opt for durable powder coating and artisan-crafted details.
-
Review and Refine: Evaluate the system over time to ensure it meets evolving needs.
The Future Outlook of Jernsenger
The future of Jernsenger involves the integration of AI-driven tools and sustainable materials. As people increasingly value stability paired with meaning, JS is likely to gain broader recognition. Brands like IKEA, JYSK, and Emma Mattress are already exploring personalized comfort settings within metal frameworks. Future iterations will likely focus on orthopedic spinal alignment and future-focused thinking in digital communication.
Conclusion
Jernsenger represents a powerful balance between strength and expression. By emphasizing durability, clarity, and purposeful communication, it offers a meaningful approach to both conceptual and practical challenges. While it requires thoughtful application to avoid rigidity, the long-term benefits of Jernsenger make it a valuable concept. As its relevance grows, it provides insight into how structural integrity and creative interpretation can coexist effectively in an ever-changing world.

Footography is a niche photography style focused on capturing artistic and commercial images of feet and footwear. It blends elements of fashion, portrait, and macro photography to highlight textures, shapes, and aesthetic details of the lower limbs. With the growth of social platforms like Instagram and TikTok, footography has become more visible in modern visual culture and digital marketplaces. The field is used in advertising, stock photography, beauty marketing, and niche content creation. Photographers typically rely on high-resolution cameras, macro lenses, controlled lighting, and strong composition techniques. Due to its low startup costs and flexible online distribution, footography can also serve as a small creative business for photographers who build strong portfolios and market their work effectively.
There are 4 main benefits of footography for creators, including high market demand, low startup costs, creative flexibility, and the ability to work remotely as an online business. It is used primarily in fashion advertising, health marketing, stock photography, and niche digital content creation. The main components of footography involve high-resolution cameras, specialized macro lenses (ML), controlled lighting setups, and specific foot anatomy knowledge to ensure high-quality composition.
Defining Footography: What Is It?
Footography is the art and practice of capturing aesthetically pleasing or stylistically significant images of feet. It combines the technical elements of photography with a focus on foot aesthetics. This field is more than just taking “foot pictures”; it is a creative discipline that utilizes macro capabilities and fine art photography techniques to transform a specific body part into a visual narrative.
The Rise of Footography in Visual Culture
Footography has grown into a prominent feature of modern visual culture due to shifts in art and technology. While photography made art available to a wider audience in the 19th century, digital platforms like Instagram and TikTok have popularized foot-focused content in the 21st century. This cultural shift reflects a growing appreciation for diverse body parts as subjects of artistic expression.
Understanding the Appeal of Foot Imagery
The appeal of foot imagery stems from its versatility in both commercial and private sectors. There are 6 main groups that drive the demand for foot portraits:
-
Foot fetish fans seeking unique content.
-
Stock photo sites requiring diverse foot types.
-
Advertisers for footwear and apparel.
-
Beauty companies promoting nail and skin care.
-
Movie makers for specific close-up scenes.
-
Blogging and foot care businesses for educational content.
How To Start With Footography: Beginner-Friendly Guide
To start with footography, gather essential gear and practice basic techniques. Starting a foot photography business often costs between $0 and $500 for beginners.
-
Acquire a camera. Use a camera with macro capabilities, such as the Canon EOS 90D or Sony Alpha a6400.
-
Invest in lighting. Use ring lights or softboxes to create even skin tones.
-
Use a tripod. Set up a tripod to ensure stability during close-up shots.
-
Learn composition. Apply the rule of thirds and experiment with arches and toe alignment.
-
Practice foot care. Ensure models use moisturizing creams and maintain trimmed nails for a professional look.
Footography as a Niche in Professional Photography
Footography has established itself as a viable niche within the professional photography industry. Success in this field requires specialized skills, such as mastering lighting for various skin tones and understanding foot anatomy. Statistics show that 85% of successful photographers in this space prioritize a strong portfolio, while 76% believe a unique style is the primary factor for standing out in the market.
Marketing Strategies for Foot Photographers
Smart marketing strategies are required for foot photographers to succeed in 2026.
-
Leverage social media. Use Instagram, Pinterest, and TikTok to share foot imagery and behind-the-scenes clips.
-
Build a brand. Create a unique brand identity by focusing on specific themes, such as barefoot beach narratives or urban pavement portraits.
-
Optimize for SEO. Use keywords like “selling feet pics” and “artful foot pictures” on your professional website.
-
Network with creators. Join online communities on platforms like Flickr or The Toe Gallery to connect with peers and clients.
Making Money With Footography: Monetization Opportunities
There are 5 main ways to earn money through footography:
-
Sell digital downloads. Use platforms like FeetFinder.com or stock photo sites.
-
Offer custom shoots. Charge for personalized foot portraits based on client requests.
-
Create online courses. Teach others about lighting and composition in footography.
-
Sell editing presets. Provide Lightroom presets specifically designed for skin textures.
-
Brand collaborations. Partner with footwear or wellness brands for sponsored content. Top creators on FeetFinder often earn $10,000 monthly, with some annual incomes reaching $70,000.
The Psychology Behind Foot Fetishism and Its Impact on Footography
The psychology behind foot fetishism significantly impacts the footography market. Neuroscientist V. S. Ramachandran suggests that the brain’s somatosensory cortex maps the feet adjacent to the genitals, which may explain the prevalence of podophilia. Research indicates that 47% of individuals in fetish-focused groups prefer feet. Understanding these psychological drivers allows photographers to create content that resonates with specific audiences while maintaining professional boundaries and ethical standards.
Frequently Asked Questions
How much can you make with footography?
You can make between $1,000 and $10,000 per month with footography. Your income depends on your marketing reach, the quality of your portfolio, and the platforms you use to sell your work.
Is footography legal?
Yes, footography is legal as long as you own the copyright to your images and comply with platform-specific content policies. Always use contracts when working with models to ensure consent.
What is the best camera for footography?
The best camera for footography is one with high resolution and macro lens compatibility, such as the Sony Alpha a6400. Macro lenses are necessary to capture the intricate details of foot textures.
Where can I sell foot photos?
You can sell foot photos on dedicated platforms like FeetFinder, social media sites like Instagram, or through your own independent website.
Lifestyle
Screw It Right: How Choosing Between Countersink & Counterbore Holes Can Prevent 20% of DIY Assembly Failures
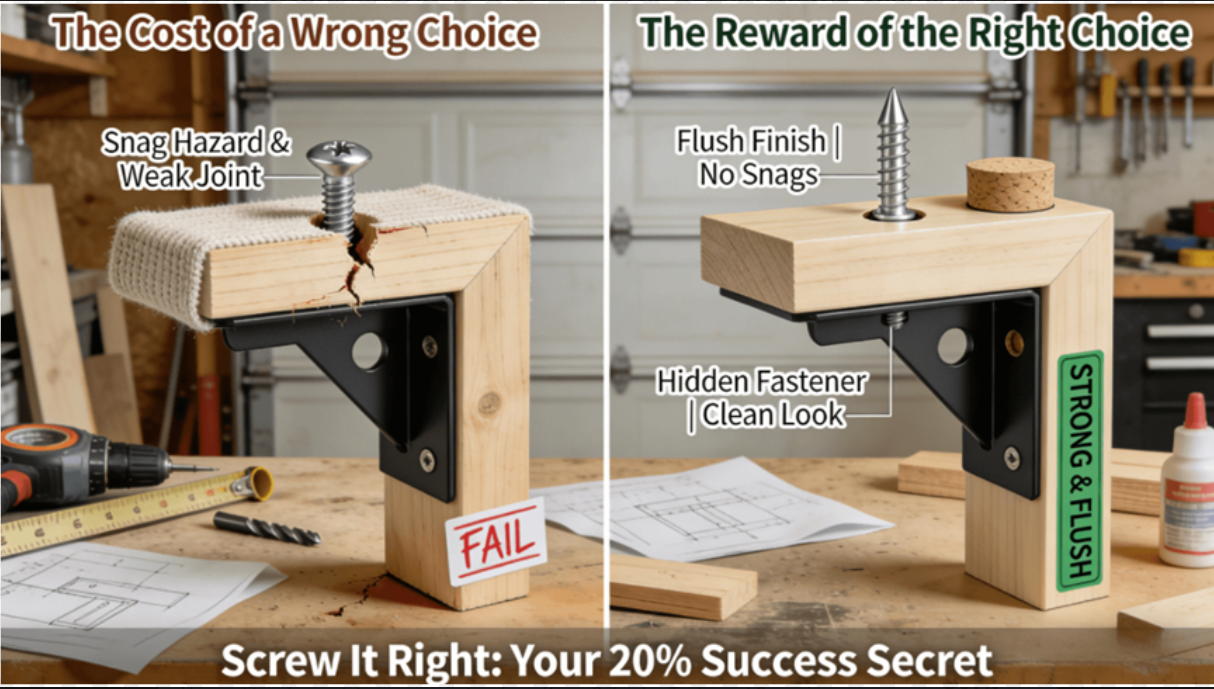
For many Do-It-Yourself enthusiasts, the common problem of assembling a custom bookshelf or repairing wooden stairs lies in the fact that the screw head either sticks out too much, catching clothing, or is set too far into the wood, crushing the wood fibers and causing the joints to come loose quickly. According to statistics, as many as 20% of failures in Do-It-Yourself furniture projects can be attributed to the improper selectionof the type of screw hole to be drilled. The problem lies in the fact that the average Do-It-Yourself enthusiast thinks in terms of the size of the screws to be drilled into the wood, as well as the power of the drill, but not in terms of the “custom-fitted seat” that needs to be prepared for the head of the screws to sit into properly. These terms — countersink and counterbore — are not interchangeable, as they have different functional needs, material properties, and aesthetic considerations.
This article offers an intuitive “Function-Material-Appearance”type of three-dimensional decision guide. By comparing the physical properties, use cases, and basic fabrication methods of these two forms of holes, any beginner can immediately know when to use the countersink for flush surface finishing and when to use the counterbore for the strongest joint. This type of methodology will definitely enhance the level ofprofessionalism of yourDIY projects. Now, let’s identify the two “candidates” based on their most obvious physical form.
What’s the Visual & Functional Difference? It’s More Than Just a “Flat” vs. “Deep” Hole
In this section, we discuss the main differences between countersink and counterbore holes, providing relatable analogies that show that the unique shape of each hole is for a specific reason, providing a functional purpose in creating a strong, reliable, and visually appealing fastened joint.
1. The Countersink: The Flush-Mount Specialist
Countersink is a hole that is essentially a conical hole, or a funnel seat, that is intended to mate perfectly with the angled underside of a flat-head screw or a countersinking bit itself. If properly driven into a surface, the countersink is fully flushwith, or slightly below, the surface of the material from which it is driven. It is intended for use on surfaces where a snag or a protrusionis unacceptable, such as on a tabletop, a floor, or any surface that is “high-touch.” The basic principle behind countersinking is a basic engineering principle that is discussed in basic references on threaded fasteners.
2. The Counterbore: The Strength-Through-Depth Solution
The counterbore hole is a two-step hole that has a larger, flat-bottomed cylindricalsection followed by a smaller pilot hole. It is a small cylindrical room that enables the head of a bolt or a socket head cap screw to be set below the surface. It is less flush but has greater clamping forcebecause the head of the bolt presses directly onto the flat bottom of the hole. It is covered by a plug of wood, epoxy, or plastic to complete the task. It is better for high-stress joints, protection of the fastener, and when working in fragile materials such as MDF or plywood, where the wedge action of the countersink can split the material.
3. The Core Distinction: Purpose Over Depth
Though depth is involved, the real difference lies in the purpose. The countersink is for finish, the counterbore is for integrity and concealment. The proper selection of the tool is the first and most important consideration in the entire assembly process. To gain a deeper understanding of the application of the selection in the engineering field for the ultimate in reliability and cost control, the engineering guide to comparing countersink and counterbore holes in CNC milling is recommended reading.
How to Choose for Your Project? A Simple 3-Question Flowchart

In this section, readers will find a useful and actionable tool for making the right decision in choosing the proper hole type for their project, thanks to this simple flowchart of three easy questions.
1. Question 1: The Aesthetic Imperative
Let’s take a look at the first aspect, appearance. The main question should be: Should the surfacebe absolutely smooth and even without any bumps at all? If the answer to this question is an undoubtedly YES then, if it is for a desk, a bench, or even a toy for a child, the way to a countersink hole will be the answer, although it might mean a bit of a compromise on the maximum possible pressure for a given material.
2. Question 2: The Material and Load Assessment
In case a smooth surface is not an absolute necessity, then you should be considering: What kind of material is it? Is it brittle like particle board? Or is the joint going to experience significant tensile or shear stress? If the answer to the question is a YES, then one should go for a counterbore. The flat bottom provides the screw head with a much larger bearing surface which prevents the screw head from pulling out or crushing the material. This kind of situation is typical for structural componentssuch as a piece of furniture, a stair stringer, or a shelf bracket.
3. Question 3: The Final Concealment Check
Lastly, there is the issue of appearance: “Do I want to completely hide the fastenerfor a clean, minimalist look?” If the response is YES, and especially if working with materials that allow for plugging, such as a hardwood with a matching dowel, then a counterbore is the only solution. This is a logical and questioning approach that is in line with all the principles of design optimization, where the fastener solution is perfectly aligned with the project’s requirements.
What Tools Do You Really Need? From Hand Tools to Pro Tips
This heading discusses the necessary and recommended tools to be used in making professional-quality countersink and counterbore holes, starting with basic handheld tools and moving to expert techniques to assure precision.
l The Essential Toolkit: Bits for Every Job: Some bits are a must for the DIYer. A combination countersink bitis a good bit to start with for countersinks. It contains a pilot drill and countersink flute all in one bit to ensure the perfect alignment.For making counterbores, you will require a step drill bitor a counterbore bit set that could also come with plug cutters. The secret here is to choose a bit whose geometry corresponds to the type of fastener you have.The countersink angle should be 82 or 90 degrees to match the screw head angle, and the counterbore should be just a bit bigger than the screw head.
l Pro Techniques for Flawless Execution: Having the right tool is half the battle, but technique is a key quality identification criterion as well. Before driving a screw into a material, especially hardwoods, apilot holeshould always be made to prevent splitting.To make sure a hole is perfectly perpendicular to the material, a drill press or a guide attachment for a handheld drill is a must. Otherwise, a mismatched seat and a poorly made joint will be the result.The sign of a well, executed hole is a precise fit between the fastener and its recess, with no gaps or material proud or recessed.
l Knowing When to Step Up to Precision: When a project requires a certain level of precision and/or working with difficult materials, it is obvious that a certain level of precision and/or quality can only be achieved by stepping up to leveraging professional CNC milling services, where every hole is precision-cutto exact specifications.
How to Avoid Costly Mistakes? The 3 Most Common Pitfalls and Fixes
This heading presents solutions to the most common mistakes made in drilling countersink and counterbore holes and discusses it in relation to cost avoidance.
1. Pitfall: The Bottomless Hole – Drilling Too Deep
The problem with countersink bits is that drilling too deep with one of them produces a crater. On the other hand, drilling too deep with a counterbore leaves nothing to bear down upon. The solution to this problem is to use a drill stop collaror to tie some masking tape around the bit at the precise depth required for drilling. This prevents overdrilling and ensures that the screw head bears down upon something at the correct locationto produce optimal clamp force.
2. Pitfall: The Mismatch – Wrong Bit for the Screw
The use of an 82° countersink with a 90° screw head or vice versa will result in the crushing of the unsupported material, thereby creating a sloppy and weak joint. The solution is the use of the correct combinationof bits that match. In most cases, the manufacturers of the screws provide the recommended countersink angle. This is an example of one of the design for manufacturability (DFM) considerations at the DIY level.
3. Pitfall: The Blowout – Drilling Too Close to an Edge
The drilling of any hole too close to the end or edge of the board can result in unattractive and weakening tear-outs. The solution is the use of the standard guideline of “2 x Diameter”whereby the center of the hole should be at least twice the shank diameter of the screw from any edge. In critical cases, the use of a sacrificial backing boardcan also help in the prevention of blowout on the exit side.
When Does “Good Enough” Need to Be “Perfect”? Recognizing the Limits of DIY
This last section offers an honest look at what DIY can’t do, which brings us nicely into the benefits of professional manufacturing for jobs that need extreme precision, difficult materials, or volume consistency.
- The Domain of Extreme Materials and Precision: While DIY tools shine with wood and soft plastics, hard metals, composite materials, or glass-filled plastics are beyond DIY’s capability. These materials demand rigid machinery, precise coolant delivery, and carbide tooling to produce a clean precision countersink or counterbore without compromising the part or tool. If the cost of materials is high, the cost of a DIY mistake can be prohibitive.
- The Demand for Batch Consistency and Complex Geometry: When you require ten, fifty, or a hundred identical parts with perfectly aligned holes, manual drilling becomes a bottleneck and a source of variability. Professional CNC machiningguarantees absolute consistency for every part. Moreover, if a counterbore is required on a curved surface or at a complicated angle, a manual operation is nearly impossible, but a 5, axis CNC mill can manage it without any problems.
- The Assurance of a System, Not Just a Skill: At the end of the day, a professional manufacturing service offers a level of system reliabilitythat is simply impossible with a skill-based DIY approach. Operations that are certified to a standard like ISO 9001do not simply rely on a skilled machinist, but rather a controlled process, documented procedures, and inspection of finished parts to ensure that every hole is within specification. This is a systemic approach to quality that includes everything from tool selection to finished part verification and is the ultimate in quality identification points.
Conclusion
In the DIY world, it is the details that make the difference between success and failure. While knowing and correctly using the difference between a countersink and a counterbore hole is significantly important not only for aesthetics, but also for a joint’s strength, a project’s beauty, and its long, term durability. With a clear understanding of the reasoning behind the choice based on function, the correct use of the proper tools, and the avoidance of common mistakes, any person can elevate their craft to a level that is almost professional.
FAQs
Q: Can I use a counterbore bit to make a countersink hole, or vice versa?
A: It is not recommended. A countersink bit is designed for a flat head screw and is cone-shaped. A counterbore is designed for a bolt and is cylindrical in shape. Using an incorrect tool for a screw can cause a poor connection and a poor appearance.
Q: What’s the easiest way to get the depth just right when drilling by hand?
A: The surest methodis to use a drill stop collar. An effective DIY alternative is to apply a piece of masking tape to the drill bit. Whatever method you choose, it is a good idea to do a test run on a piece of scrap material of the same type first.
Q: How do I fix a countersink hole in my wooden table that I have stripped without having to replace the whole table?
A: One way you cando this is by gluing a hardwood dowel into the hole that you have stripped and then waiting for the glue to dry. You can then cut off the dowel so that it is flush with the surface. Thereafter, a pilot hole with a countersink hole of the correct size can be drilled through the center of the dowel for a new screw location.
Q: Is it really necessary to use both a pilot hole and a countersink, or would one bit suffice?
A: It is always bestto make a pilot hole, especially when working with hardwoods, so you get the best result. However, a countersink drill with a pilot hole can accomplish the task in a single pass.
Q: How to decide what size countersink to use with my screw?
A: The biggest diameterof the countersunk part should be a little bit bigger than the diameter of the screw head. Some packages specify the countersink sizes that can be used with the screws. Also, you can measure your screw head and pick a bit 0.5 to 1 mm bigger to get a flush finish.
Author Bio
This article is based on detailed expertise in precision joint technology as well as design for manufacturability.As a certified precision manufacturing partner (ISO 9001, IATF 16949, AS9100D), LS Manufacturing team is dedicated to turning their deep engineering knowledge into reliable products for you.Have you got a creative idea that requires components with tighter tolerances? Upload your design sketch and get a preliminary manufacturabilityreview free!
-

 Entertainment2 months ago
هنتاوي.com Hub for Trending Arabic Content and Digital Stories
-
Others2 months ago
Insert Han Reference Here: The Veilside Fortune RX-7
-
Others2 months ago
Humble Celebrity: Ramon Bautista’s Lancer “Evo III”
-
Others2 months ago
Pure Rally Bred: Law’s Lancer Evolution VI Tommi Makinen Edition
-
Others2 months ago
Everyday Show Car: Henry’s Jaos Complete Edition Toyota FJ Cruiser
-

 Technology1 month ago
Eporer Revolutionize Industries with Innovation and Efficiency
-

 Business1 month ago
Charfen.co.uk Smart Business Growth and Leadership Solutions
-

 Gaming2 months ago
Garforfans Ultimate Fan Hub for Gaming and Pop Culture